


Hello everyone,
It’s been a long time since I last posted a technical tutorial, so finally, here’s a new one. This one will tackle the problem of creating procedural foam for my game. I’ll try to explain my thinking process and the different choices I’ve made to create this:
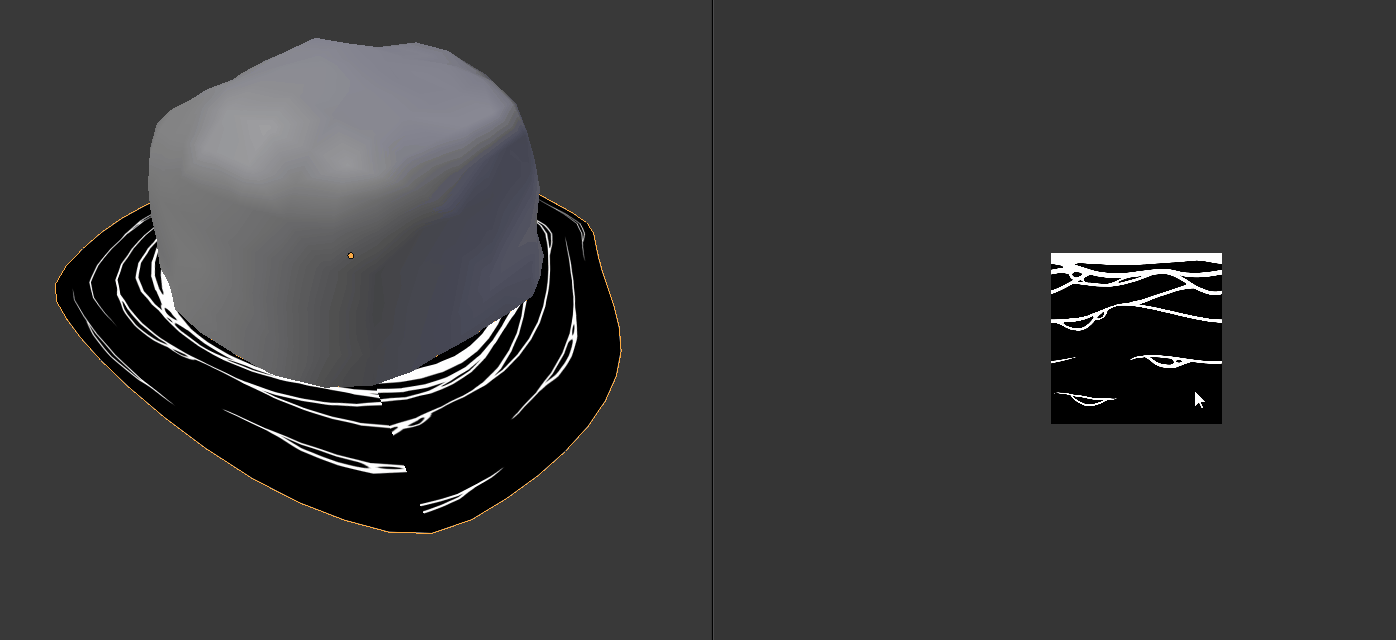
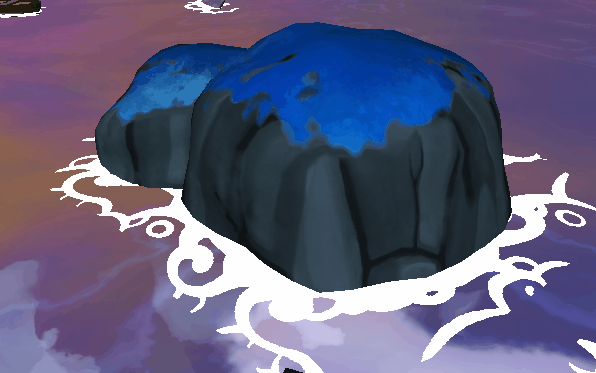
The final foam rendering in my game.
Here, I use Unity as a game engine, Blender for modeling and texturing, and Krita to paint textures.
I – Problem
My game takes place in an ocean-covered world, so having foam on the shores seems necessary. My biggest problem here is that my game is still being modified and island shapes may change or new islands may appear. So, I want to find a way to create foam easily and fast enough.
Moreover, I may change the designs many times for a single island, and I don’t want to have to re-create foam meshes from scratch every time.
A while ago, some friends pointed to me the Rime VFX breakdown video by Simon Trümpler. There are many incredible tricks in this one. The foam in particular is very well crafted, and the effect is stunning (as long as you go for a stylized rendering of course).
The only problem I saw with this approach is that it is a bit daunting to create seamless uv maps for each foam mesh. Indeed, in Blender, when you want a ring/circular mesh to have a seamless mapping, you need to perfectly align manually the uvmap so that the image repeats itself without breaking the pattern. It’s OK for a single asset, but for many unique islands and rocks in my game, it’s more than I can handle. In addition, with cyclic seamless uv mapping, if you need to tweek the wave length afterwards, you can’t scale texture coordinates as you want; you are limited to integer multiples. I have to find something else.
Process of scaling uv map to get rid of the seam. Perfectly matching both sides of the seam can be quite long for many assets.
II – What I want
Ideally, I aim at:
- An easy way to create foam in Blender, with as few clicks as possible. Ideally, I would like to only handle modeling, and no uv-mapping at all.
- Having moving waves without (too) obvious repeating pattern
- Easy parameter tweaks in order to change wave length, speed, or look.
- Graphically, as I use deferred shading which is not very transparency-friendly, I want a pure colored foam with some sharp edges. So I’ll use clipping based on texture values. Here’s what I’ll try to achieve:

III – Base texture with world coordinates
As usual, my approach is far from perfect and is only a compromise between what matters to me and what is technically reachable (to me too :p).
My first idea was to use automatic uv coordinates, such as vertex world coordinates, which works pretty well for my procedural terrain mapping (which I might explain too one day, hopefully). However, world coordinates do not embed any kind of information about an hypothetical “privileged” direction.
This means I can’t have a “classical” foam texture with “lines” along the shore edge like the one below, because it would be OK on some sides of an island, but not on the other sides:
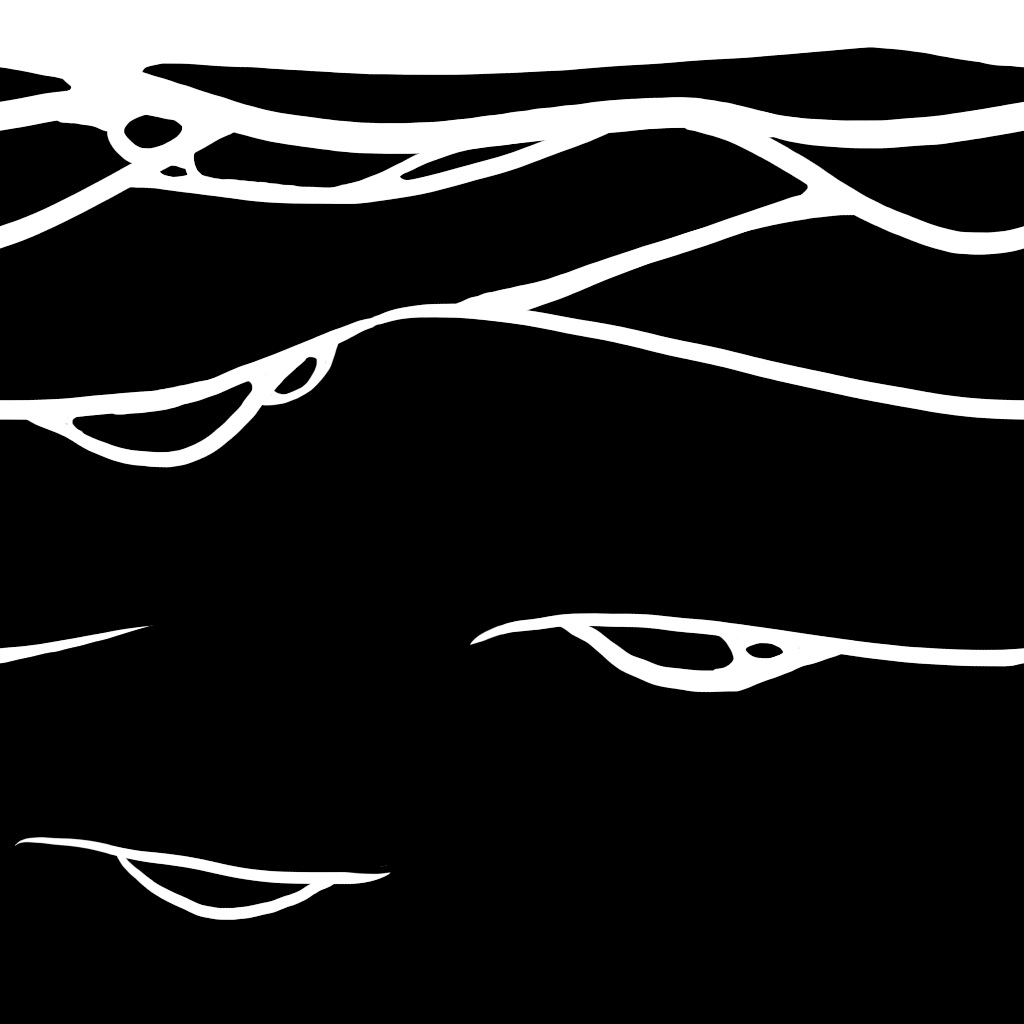
In this texture there is a strong global direction (horizontal). The corresponding ingame look with world coordinates doesn’t work.
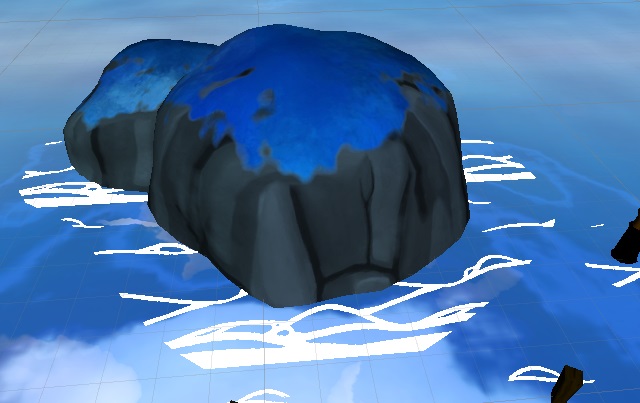
When I use automatic mapping, I must have some neutral/uniform texture (direction wise) for example something like this:

A simple foam texture with no main direction. The corresponding ingame look is a bit better…
OK, this is better, but it’s still a bit stiff and disappointing, but that’s the price to pay for an automatic method. Anyways, it doesn’t seem to be enough to get visually interesting foam.
IV – Adding procedural waves from v coordinate
Now, if I want some lines along the shore, or the foam moving towards (or away from) the shore, it is absolutely mandatory that I have an additional “direction” information embedded in the mesh. This is also necessary to make the foam “vanish” when it is far away from the shore. This specific direction changes for each rendered triangle, so I need to encapsulate it in a way or another on the mesh vertices.
Thus, I guess I still need to use a basic uv mapping to specify this “shore direction”. To achieve this, I only need 1 texture coordinate, which I choose to set to v (see picture below). The idea is to have v=0 on the outer edge loop of the foam (the “sea side”), v = 1 on the middle edge loop of the foam (the “ground side”), and v = 2 for the edge loop that will be “inside” the island.
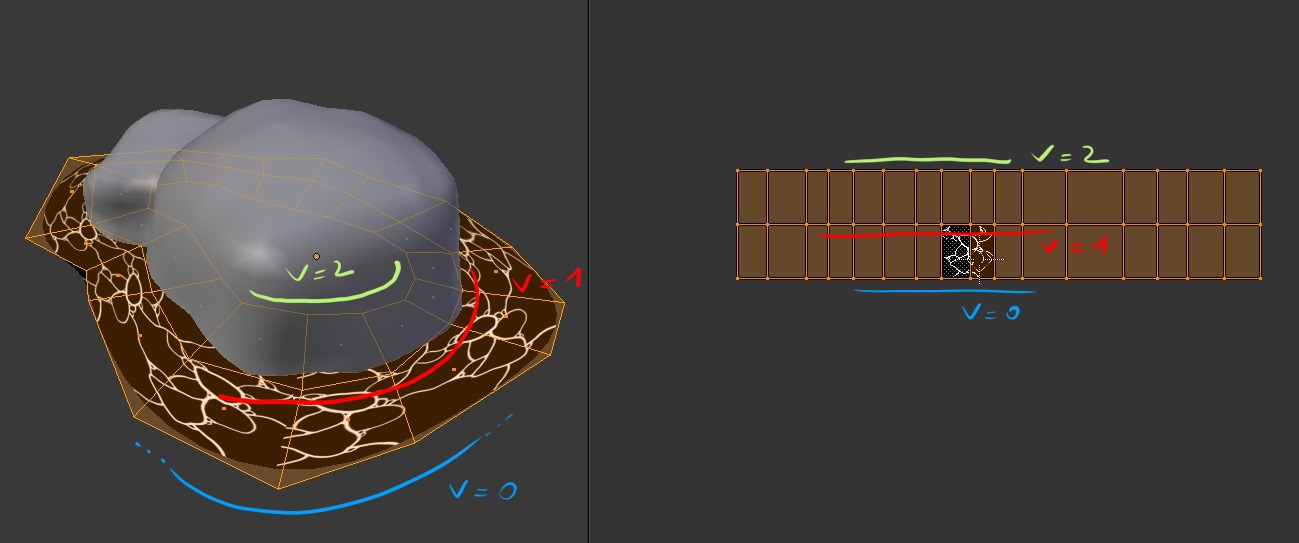
The basic texture mapping. Here I don’t really care about the seam problem (you can see it at the bottom of the mesh). I only work on the v coordinate.
So the movement towards or away from the shore will be built from this simple texture coordinate. The easiest way to create the famous “foam lines” is so use a sinus of v. To make it move, I offset it depending on the current time and the wave speed.

sinus(frequency*v + speed*time) ; clipped at 0
Keep in mind that, in order to get sharp edges, I clip any fragment value below a certain threshold.
Changing the clipping threshold creates larger or smaller waves
Changing the frequency creates more or less waves
Now if I want the sinus foam to wash away as it enters the sea, I need to raise the sinus according to the v coordinate, like this for example:
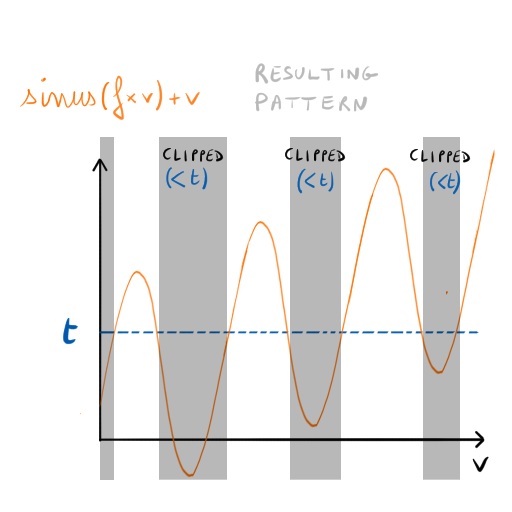
sinus(frequency*v + speed*time)+v ; clipped at a good threshold t. Waves get thinner as they vanish in the sea
Now let’s have fun a little bit by adding noise to this initial shader, in order to make it more “natural”. As a noise-based texture, I use a simple RGB seamless noise texture that I made with GIMP using the “solid noise” generator:

Seamless noise made with GIMP.
From this, I can randomize the speed, the frequency or any other parameter of the sinus. Randomizing the frequency is quite interesting; it is a way to locally add more or less wave lines like this:
Adding (world) noise to frequency: sinus((frequency+noise(xz))*v + speed*time)+v; where xz are the world horizontal coordinates. See how some zones get more foam lines, while other zones get fewer.
The generated sinus part seems to work quite OK, but I think it still misses some “connections” betweens the foam lines, and, to add them, I need to rely on world coordinates. I could use world noise to add these connections, but I wanted to try a more controled approach by using my handmade texture on top of it.
Mixing the sinus procedural waves and the hand painted texture.
But if I use a pure binary texture for foam connection on top of the generated sinus waves, I have no control at all on the “vanishing” of this texture. That’s why I chose to use a distance transform texture.
V – Distance transform textures
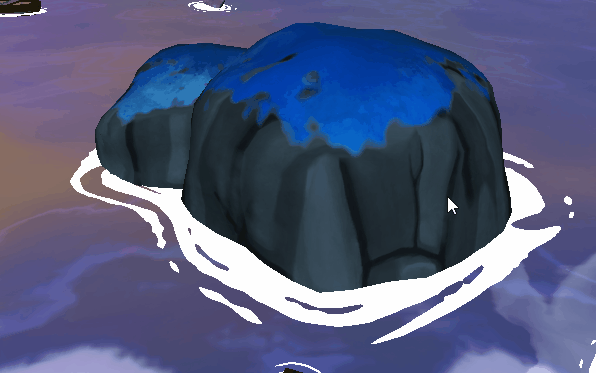
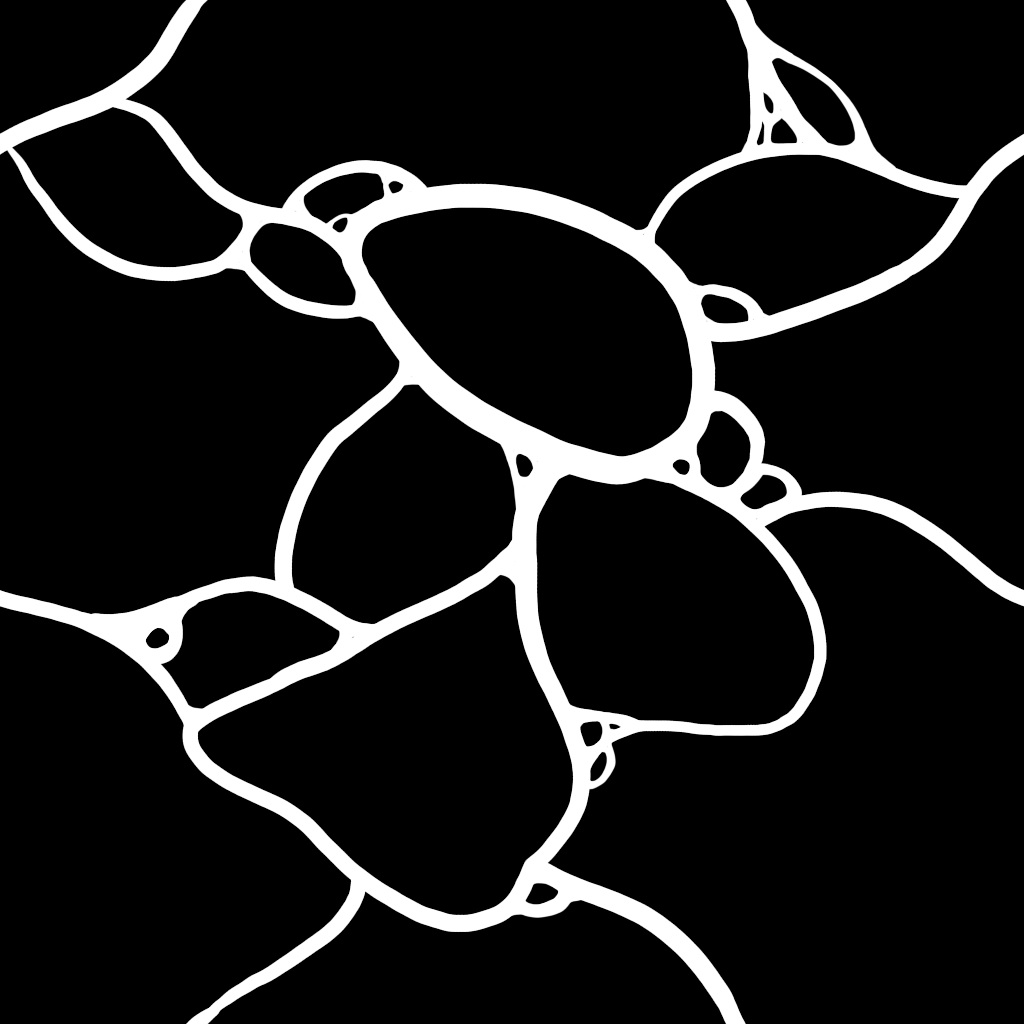
Distance transform images are created from a pure black or white base pattern. Each pixel of the distance transform image represents the distance to the nearest white pixel in the base pattern, like this:
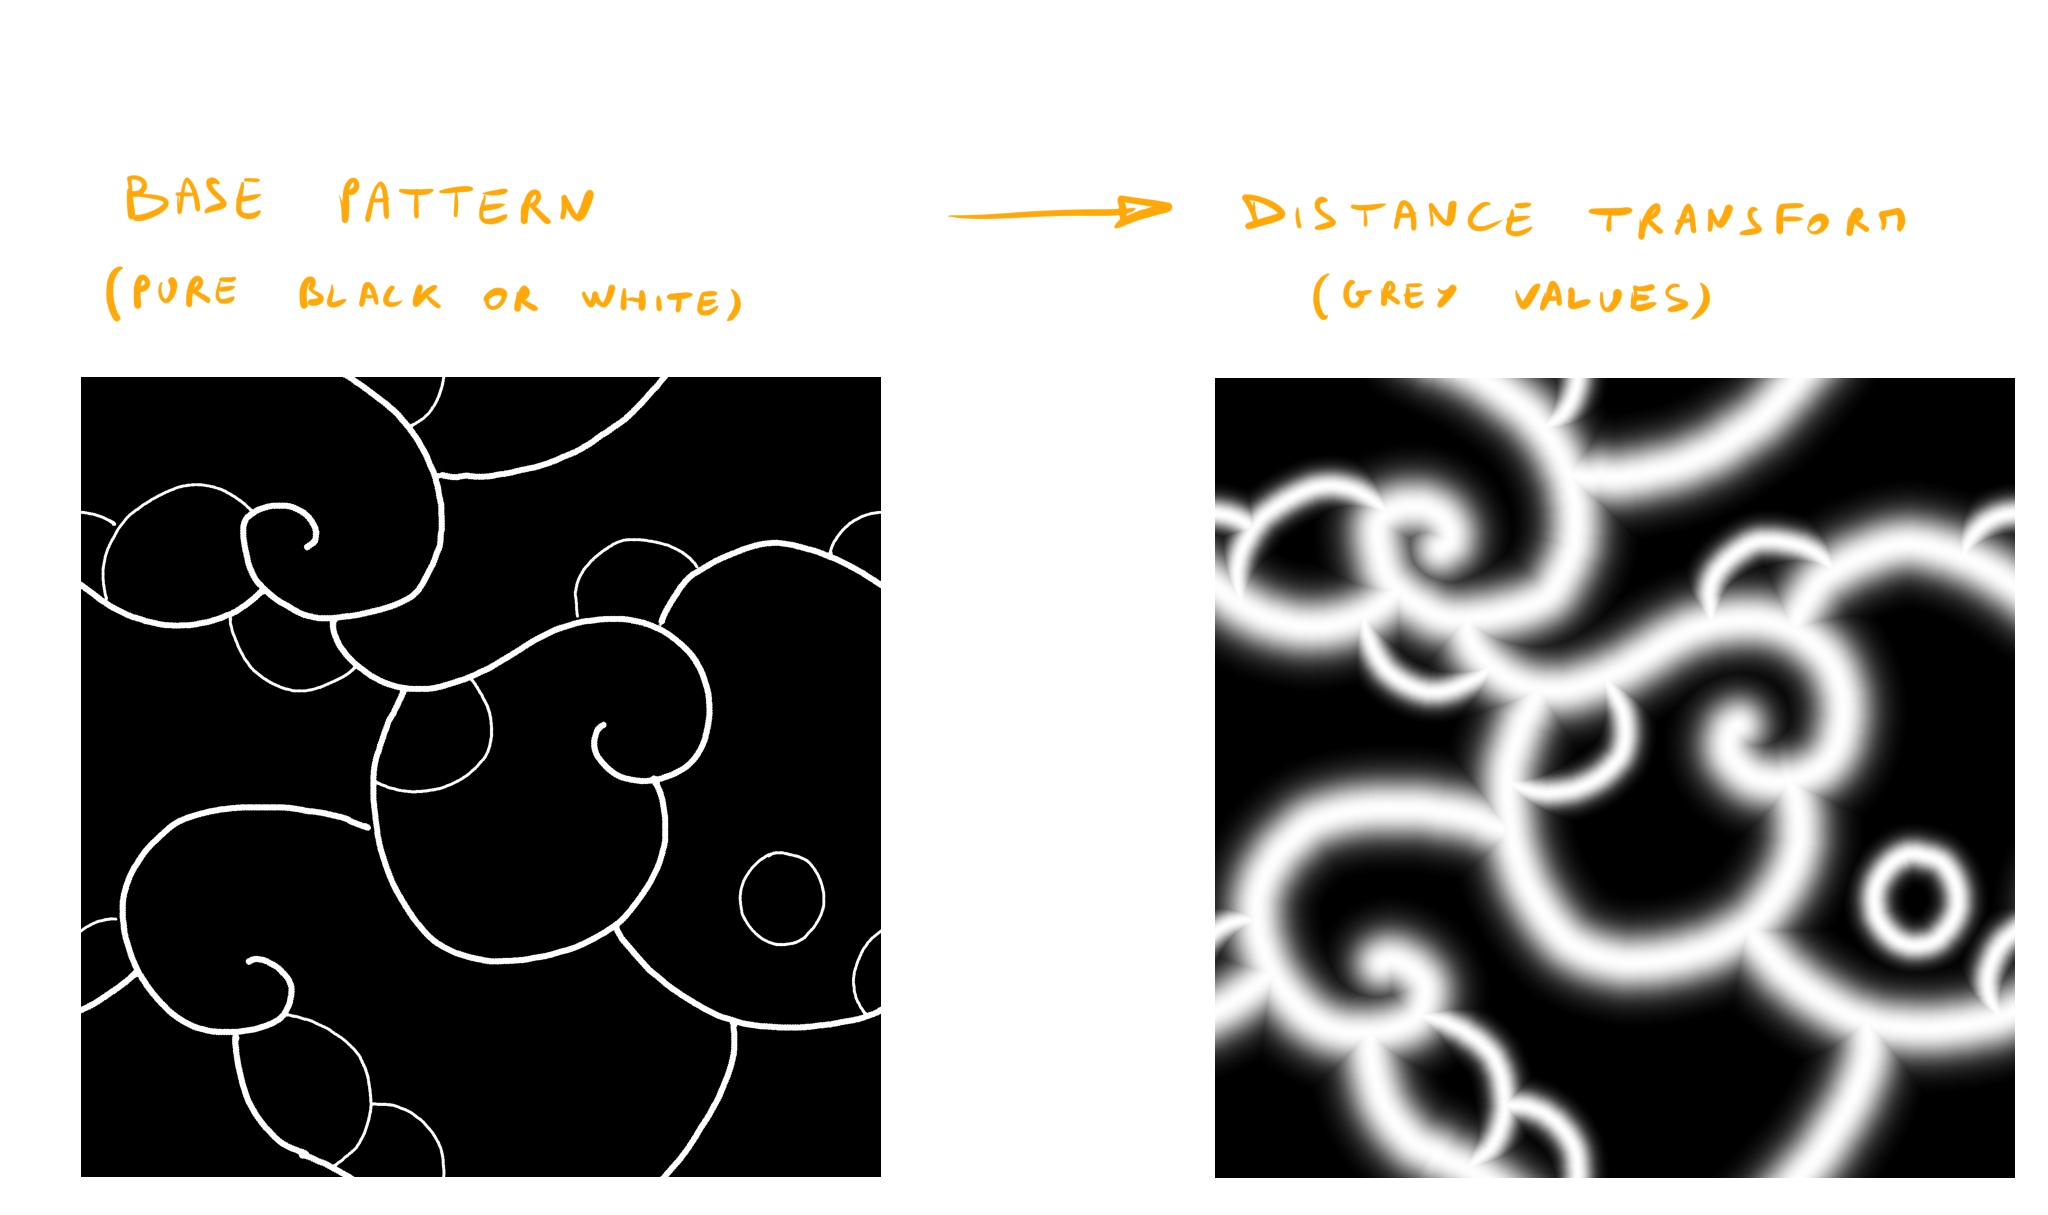
Well, actually, I used an inverted distance transform here, because it’s more convenient for the clipping phase, but you get the idea 😉 And yes, I used a different pattern than the previous one.
Distance transform images are just a way of seeing the data. You might also interpret it as a height map (even if the meaning is slightly different, it might help to grasp the concept). The basic idea is to have an image that embeds some kind of “evolution/animation” of the base pattern.
Distance transform images may be generated through filters, but generally, these filters don’t handle very well (or even not at all) seamless images. Another way is to paint some pseudo distance transform image directly. Of course, it won’t be mathematically accurate, but as a benefit, we can create more custom animation patterns. An acceptable way I found, is to use the unusual following settings in Krita, (the painting software I use):
- Use a “Build-up” painting mode (vs Wash by default), so that you can intersect the current stroke properly
- Use the “Greater” brush fusion mode, so that only higher values will be drawn on top of what is already drawn (which is the correct way that real distance transform images are merged together)
- Use a soft brush with a linear falloff from 100% to 0%, so that the maximum value range is used, which will result in smoother animations. Actually, the falloff will act as an “ease in/ease out” parameter for the animation.
- No pressure sensitivity (well, I guess this is personal choice)
- Activate the “Wrap Around” mode to create seamless textures (as I paint a lot of textures, this is my favorite option in Krita).
which results in this:

Directly painting a seamless distance transform texture. Notice the “X” pattern appearing on the intersection, this is typical of a distance transform image.
Of course, this is a very “mathematical” way of approaching this idea. You can always draw with the default soft brush and get something totally OK (even more natural I think), but you have to always keep in mind that you are “painting an animation” (never thought I would say that one day).
VI – Tweaking and mixing
Now, I have more control on the rendering of my hand painted foam texture:
tex(xz); clipped at a certain threshold t; Now I can control the width of the pattern by changing the clipping threshold for my hand painted foam texture.
Of course, I used a few tricks to make it more interesting:
- Adding the v coordinate (to make foam larger near the shore and thinner on the seaside), just like for the sinus waves
- A speed parameter texSpeed to make the texture move slowly
- A bit of world coordinate moving noise to create some “warping” effect
tex(xz + noise(xz+noiseSpeed*time)+texSpeed*time)+v; clipped at t
And, now, I can finally mix both the procedural sinus waves, and my hand drawn foam. After a few tweaks on threshold, speeds, noises, and other parameters, I ended up with this:
The final result mixing procedural and hand drawn foam:
ratioSinus * [sinus((frequency+noise(xz))*v + speed*time)+v] +
ratioTex * [tex(xz + noise(xz+noiseSpeed*time)+texSpeed*time)+v];
clipped at t.
In the end, I also added a few parameters to control the noise amplitudes and scales/frequencies, so each noise(xz…) is in reality noiseAmplitude*noise(noiseScale*xz…). This gives more control on all the deformations happening. I also replaced the simple “+v” with the more versatile affine fonction “+a*v+b“.
VII – Building in Blender
So in the end, I still have to make a uv mapping (or more exactly a v mapping). But the good news about this is that I only have to make it ONCE for ALL the game. Indeed, for any new island (or any immersed object), I can copy a base foam mesh already v mapped, and I can focus on modifying only the mesh:
- If I move vertices, the mapping will still be OK.
- If I delete an edge line, the neighbour v mapping won’t be affected
- If I add vertices with a loop cut, the uv mapping for the new vertices will be automatically interpolated from their neighbours, resulting in a good v coordinate.
This would not have been the case if I had used the u coordinate to make more classical texture mapping, because any move of vertices along the shore edge would have stretched the texture (and I would have had the seam problem for each new island).
VIII – Going further
We could go even further by working on the following points:
- Layering two or more hand painted foam textures, with different speeds and scales to create a unique pattern everywhere.
- Randomizing the sinus speed to have local flow variations
- Adding noise to the threshold or to the affine function part (“+v“/”+a*v+b“) so that some zones would have foam on a very short or very long distance
- Randomizing the world coordinates to create even more warping effect
- Put the time offset through a sinus to make waves come and go. Right now they only go away from the shore.
By the way, I didn’t speak at all about optimization here, and there is surely some work to do about it (especially on noise textures that could fit on fewer channels than a full RGB image).
Anyways, this was a nice journey to me, and even if the result is not super awesome, I really enjoyed the process of mixing a bit of maths with more arty considerations. I hope this will help somebody out there!
Thanks for reading!
Peace!